

What Is Proof Colors In Photoshop
One of the advantages of working on images inside of photoshop afterwards raw conversion, is the ability to soft proof your images to a final output which in most cases for a lensman is a photographic or inkjet print.
And so, What Is Soft Proofing & Why Is Information technology Useful?
Well, soft proofing is simply a technique that allows you lot to view on your figurer monitor what your image will expect like when information technology is printed onto photographic paper or any other medium, assuming that you take a calibrated figurer monitor.
The process of soft proofing happens whilst you are yet able to adjust and edit your epitome inside photoshop and your epitome still remains in it's original color working space, which could be Adobe RGB (1998), sRGB or ProPhoto RGB for instance.
The benefits of utilising soft proofing is that you can correct any change in color, saturation, density and contrast that may occur when converting your image to a printer/paper output profile prior to printing.
In render, your print will ameliorate lucifer what you see on screen when viewing your prototype in it's original color working space.
The only downside of this process is that you lot will need to save a copy of your unedited image prior to making whatsoever corrections for your printer and paper type. And then you lot want to go ahead and specifically name this file according to the printer, paper or output profile yous're using to soft proof.
This is best practice, that way you'll have two files the original and the print file. The original file can be archived and then soft proofed to any other output yous may determine upon in the future without compromising its color or quality.
So, Let's Now Demonstrate How This Process Works?
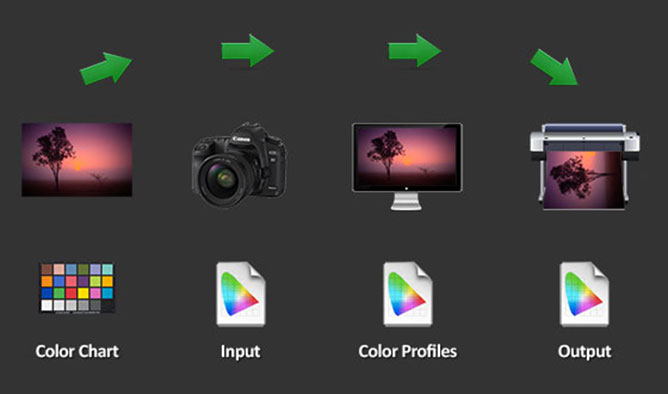
To get started, we demand an image that has been candy and converted to a working space colour contour which in virtually instances will happen during the raw conversion.
If you're not sure, you can check your image profile by going to the bottom of photoshop'southward workspace where you'll find a drib downwardly card which you tin cull to gear up to "Document Profile" which will tell you what colour profile y'all are currently working in.
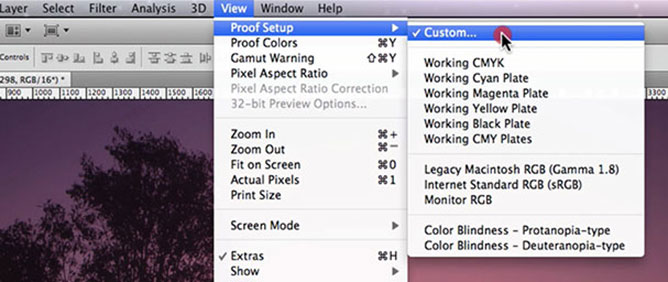
Once you know this data, you can proceed to "View > Proof Setup > Custom".
Inside y'all'll find options for defining custom proof weather condition which can then be saved as presets for the future.
Device To Simulate
The "Device To Simulate" drop downwardly menu specifies the colour profile of the device for which you desire to create the proof. The usefulness of the chosen profile depends on how accurately it describes the device'southward behavior. Ofttimes, custom profiles for specific paper and printer combinations create the well-nigh authentic soft proof. Boosted color profiles may exist added to Photoshop that volition and so testify up within this card if yous cannot detect your output device.
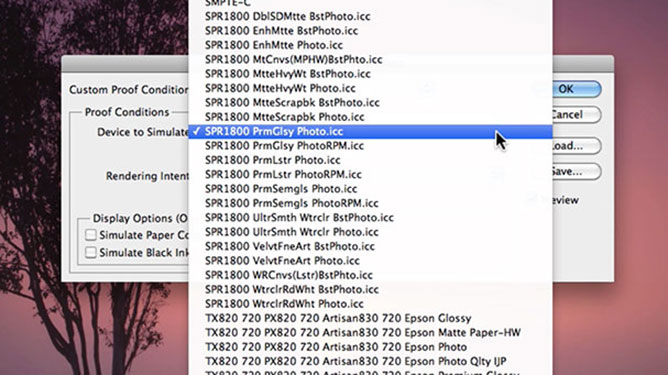
Underneath the "Device To Simulate" you'll find a checkbox called "Preserve RGB Numbers" which simulates how the colors volition appear without being converted to the color space of the output device. This option is nigh useful when you are following a safe CMYK workflow.
Colour Rendering Intent
The next important option yous demand to select is "Rendering Intent" which is made available to you when "Preserve RGB Numbers" is not checked. Photoshop has four colour rendering intents to chose from each of which uses a different method to convert the color values inside an paradigm to your called output contour and issue in culling outcomes. It'due south crucial to remember that when you finally convert your image to it'due south final output that yous not simply maintain the exact output profile you lot used for soft proofing, just likewise the exact rendering intent.
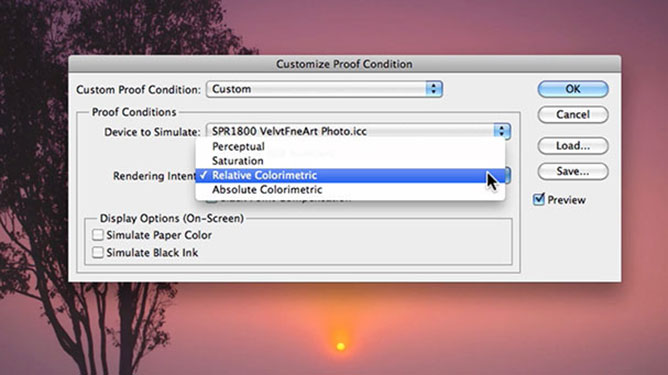
One time a rendering intent is selected you may choose whether or not to utilise "Black Indicate Compensation". If checked this option will ensure that the shadow detail in the paradigm is preserved by simulating the full dynamic range of the output device. Select this option if you lot programme to use black point bounty when printing (which is recommended in virtually situations).
Display Options (On-Screen)
Finally beneath all other settings you'll find "Brandish Options (On-Screen)" which has 2 checkboxes, "Simulate Newspaper Color" and "Simulate Black Ink".
If you know for a fact that the output newspaper blazon has an off white appearance that's quite flat you may decide to select "Simulate Paper Color". In most cases yous'll just ever find off whites in canvases or fine fine art papers when printing using inkjet printers for example. Not all profiles support this option.
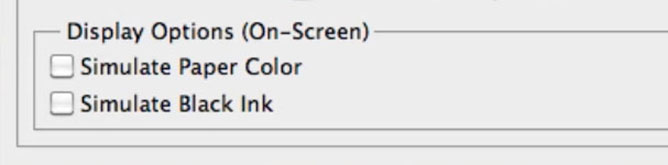
The final checkbox is "Simulate Black Ink" which simulates the nighttime gray you go instead of a solid black on many inkjet printers, according to the proof profile. Not all profiles back up this choice.
Both "Simulate Paper Color" and "Simulate Blackness Ink" should be used with caution.
Toggle
In one case you've made all of your customizations and you've saved or clicked OK… Soft proofing is active, now in order to visually cuff how you paradigm will print, I similar to rapidly toggle between my working space contour and my chosen output profile, turning "soft proofing" on and off to identify the differences in color values and densities that may change.
To toggle soft proofing on and off the keyboard shortcut for a PC is "control + Y" and for a MAC it is "command + Y".
Quick Tip: When "Soft Proofing" or "Proof Colors" is active you'll find an hastrise beside the file name of the image you are working on which makes it quick and easy to identify when this setting is on or off.
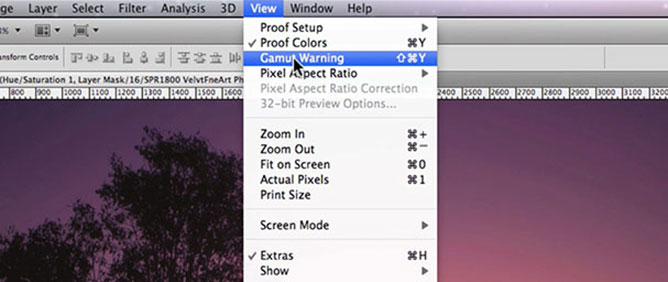
Often it can be hard to visually place colors that may be clipped or losted during the conversion process from ane profile to another and it's for this reason that I recommend you feel with Photoshop's "Gamut Warning" which is located nether "View > Gamut Warning". All colors that are outside the colour gamut of the output profile you are converting to will automatically be shown in grayness and therefore can be corrected to conform to your output profile.
Conclusion
By now I hope that you can run across the benefits that are associated with soft proofing your images prior to printing. But with that said soft proofing is very dependant on the accuracy of the selected output contour. Needless to say that a quality output contour volition evangelize far meliorate results than that of a flawed contour.
And whilst the process of soft proofing is extremely powerful you still need to make sure that your images are converted to the same output profile you cull for soft proofing prior to printing.
![]()
Annabella Dean is a passionate lensman that loves travelling around the earth capturing every moment with her camera. With the completion of her Available of Photography, she continues working on refining her craft.
Source: https://www.shutterbuggs.com/what-is-soft-proofing-in-photoshop/
Posted by: fergusonbroppack.blogspot.com
0 Response to "What Is Proof Colors In Photoshop"
Post a Comment